Hi guys! Welcome to my very first post!
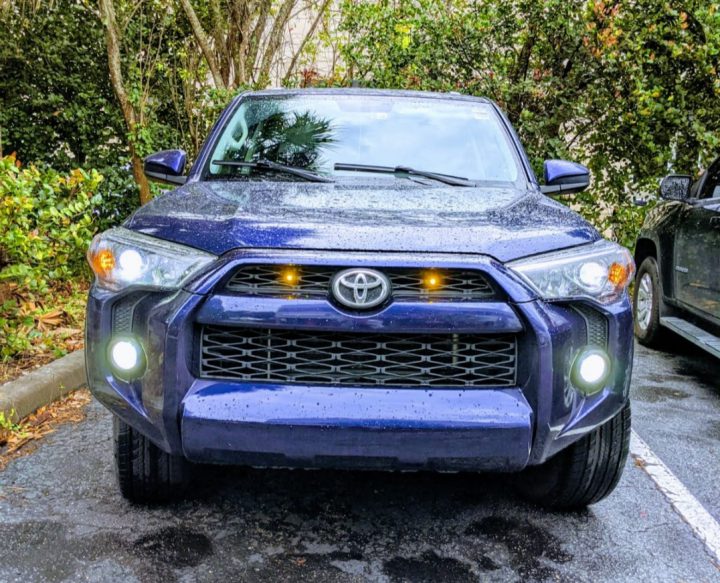
In this post I will explain how to wire LED lights to a 4Runner grille, this was just a simple idea I had in order to mimic those awesome looking raptor style grille LED lights that (almost) everyone wants to have!
For this project we’re going to need the following items:
Overview
In this opportunity we want these LED lights to go on when the low beam headlights are powered up, so this will be a very easy and simple install.
We will acchieve this result by splicing the positive wire of the LED lights to the positive wire of the low beam headlight, don’t worry about overloading the circuit, as these LED lights are around 1w, at 12v DC using Ohms Law these have a current draw of .08 – .09 amps. Since in this case we are only using 2, the difference in the current draw in the circuit will not be relevant after we finish our install.
Having this clarified, let’s begin installing our LED lights!
1.- Uncover grille backside
First, let’s remove the black panel that’s under the hood and meets the high side of the grille, in order to remove this you have to take out all it’s plastic rivets and also 3 screws, as shown in video above.
2.- Remove the upper part of the grille
Next we’re going to be removing the upper side of the grille, for that we have to remove a few more plastic rivets, and a 10mm bolt. After finishing this, it’s just a matter of pulling gently the grille towards yourself to make it pop out.
3.- Find power for your LEDs
Now we have to find the wire that will supply power to our LED lights, in order to do this we have to pull out a headlight low beam bulb, and test both wires to see which one is the positive. Using a 12v tester pined to ground, check both wires by exposing a small amount of wire in them.
In my case, I thought the white wire was going to be the positive line so went for it at first shot, but it resulted being the opposite. I had to seal the wire and repeat the process in the other wire to verify that it was positive.
4.- Splice a new wire into the power source for your LEDs
After finding our power source, let’s disconnect the negative terminal from the battery. Afterwards let’s splice a wire to the positive line of the low beam, and run it all the way to the grille where we will mount our LED lights. Try your best not to run the wire close to moving parts or leave it hanging loosely.
5.- Mount LEDs in your grille and prepare them for connection
Now let’s go prepare our LED lights for wiring.
Mount them in the desired position on the grille, then we will expose both positive and negative wires in both LED lights, and next we will proceed joining positives together, and negatives together.
After that, put a male crimp connector on both ends.
6.- Finish positive and ground connections
Getting close to the end! Add a female crimp connector to the end of the wire we previously had spliced into the positive low beam wire.
Grab a small piece of wire (enough to reach to a good ground), add a female crimp connector to one side and a “U” crimp terminal, and put the “U” side in a ground source.
7.- Put grille back in place, connect LED wires to ground and power
Now install your grille back in it’s place, connect positive male terminal to the female wire that’s spliced to the low beam wire, do the same with the negative male to ground female.
Connect negative pole of the battery, put everything back in it’s place, and you should be good to go!
End result!
Now you have a nice detail installed in your 4runner grille!
Let me know in the comments below if you like it!
