Enter running board led underglow lights!
As funny as this may sound, one night my grandmother was about to hop on to my truck, and she complained that the car was too tall for her and that she wasn’t able to see the running boards in the dark since they are black. For this reason, I decided to come up with a solution that is functional and that also looked stylish for my truck.
Overview
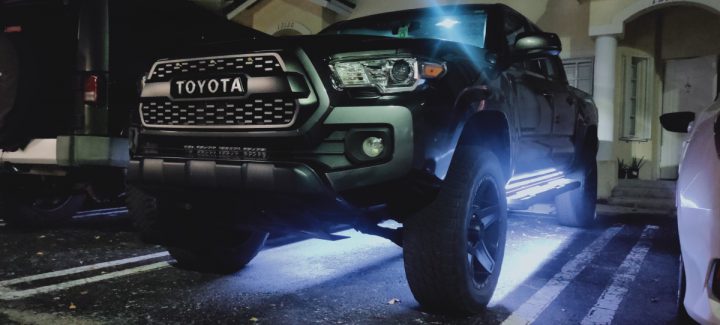
This time we’ll be installing running board led underglow lights under the truck, just above the running boards, and we are going to be wiring them to the dome lights circuit so that they turn on and off fading in and out, when we open any door, unlock the car with the remote.
Note that where you place the LED lights is totally up to you! If you want, you can do this same install and wiring tutorial but place the led strips or lights to power up somewhere else, and it would work!
The only thing to take in consideration if you change the device to power up, is that you must calculate the total amp draw so that you what fuses to use.
Having said this, see below the items we will be using this time:
- 5m of waterproof LED strip - White
- Wire Crimper
- 16/18 gauge wire
- Male/female bullet wire connectors
- Heat Shrink
- Automotive double sided tape
- Wrench Set
- Soldering Lead Wire
- Soldering Iron
- Electrical Tape
- Liquid Electrical Tape
- Heat Gun
- Measuring Tape
- Solderless connectors / Wire splicers
- 24 AWG splicers
- Wire braided sleeve
- Clear waterproof caulk
Now that we now what items we’re going to be using, let’s jump right into it!
1.- Measure the length LED strip needed and cut it
The first step towards installing our running board led underglow lights will be prepping the LED strip to paste it in place.
For this we have to measure the length of LED strip that we need, once you have measured and find a length you feel that will look great, find the cut mark closest to the length you need and cut the LED strip there.
I only measured one side of the car because I knew that I was going to use two strips of the same length.
2.- Seal and waterproof both trimmed ends
Use heatshrink to protect the cut ends, cut them to a size so that not too many LEDs are covered by it. Also leave a small portion out of the LED strip, probably 3/4 of an inch or more, so that when it’s hot you can press it with a plier in order to have it closed.
Use a heat gun, hair dryer, or a lighter to shrink the heatshrinks, and then when it’s cooled down, apply electric liquid tape generously to seal the LED strip.
3.- Extend passenger side LED wire by soldering more wire to it
The dome wires in which we need to splice our LED strips are located on the driver’s side “A” pillar, for this reason the passenger side LED strip will need to have longer wire in order to reach that spot.
You can measure the distance and cut the wires accordingly, but in my case I decided to do it differently. What I did was, grab all the black and red wire I had and soldered it to the red and black wires of the LED strip. Afterwards I would run it all the way to the “A” pillar so that I know for sure where I have to cut it, more about that later.
4.- Clean the surface where the LED strip will be pasted with double sided tape
Using degreaser, clean the area in which the LED strip will be pasted, finish it with alcohol and a paper towel. Then paste the double sided tape into the LED strip, and place it on the previously cleaned surface.
To make sure that your running board led underglow lights stay in place, it is very important to clean the surface property, so that you ensure proper adherence.
5.- Remove plastic panels and run the wires to the driver side
Remove plastic panels close to the front passenger door, and start running the wire as tightly as possible, through the firewall under the front passenger seat, onto the plastic clips shown in video.
Run it under the carpet under the dash, pass it behind the dash where the audio system is towards the driver pedals. Keep running it this time under the carpet behind the pedals, until it reaches the area under the driver side where there is a bunch of wires and connections from factory.
6.- Cut the wires and cover them entirely for protection
Cut the wire leaving enough to work with as we will need to add connectors later. Pull the wires out completely, and put them together by covering them with electrical tape (I know!).
Make sure you use heat-shrink and liquid electrical tape on the start of the LED strip wires in order to protect the circuit. Then cover the rest of the wire with electrical tape, and run it again to the driver side the same as you did before.
This could have been done easier by using one of these wire sleeves before running it to the driver side, the you could just cut the wire including the sleeve. I could have saved a lot of time by not pulling the wire out and covering manually with electrical tape, but I didn’t have any wire sleeve at the moment.
After finishing this step, you can proceed and put back front passenger side plastic panels back in place as we are done on this side.
7.- Solder, extend, and cover wires on driver side LED strip
Repeat steps 3rd to 6th on the driver side LED strip, and now you should have a LED strip pasted above the running board on the driver side, with a waterproof wire long enough to reach the same spot under the dash where the other wire was previously run.
We need to run this wire through the firewall underneath the carpet of the driver footwell, but for this we need to be able to lift the carpet and locate the firewall.
Remove the white plastic clip that’s holding the carpet as seen on video above, remove the rubber plug from the firewall, and pass the wire through the hole. Once you have easy access to the wire on the footwell area, make a small hole in the rubber plug and pass the wire through it.
Pull the wire tightly, place the rubber plug in place, and leave the wire next to the passenger side LED wire.
8.- Join positive wires, negative wires and add crimp connectors
Cut any excess wire from driver side LED strip, then expose the copper inside both positive and negative wires from both driver and passenger side LEDs, and put together positives, and then negatives together as well.
Once you do that, make sure to put heat-shrink before crimping a male bullet terminal on both connections.
9.- Disconnect and deactivate airbag
Under the “A” pillar there is an airbag, so before we attempt to open it, it’s better to take some actions in order to avoid accidental deployment.
Remove the airbag fuse underneath the dash with the small plastic fuse remover that should be inside you car’s fuse box, and remove the negative terminal from the battery, which comes handy as this must be done everytime some electrical work has to be done in a car.
Leave the car with the battery disconnected for around 20 minutes before accessing the airbag.
10.- Open the "A" pillar and find the dome wires
In order to open the “A” pillar, you have to open a small cap on the pillar that says “SRS airbag”, this can be opened easily with your nails or some plastic tool, do it carefully so that the plastic around it doesn’t get scratched or marked.
Under this cap you’ll find a bolt, remove it with a #10 wrench socket. Afterwards it’s just a matter of gently pulling the pillar outwards until it pops out.
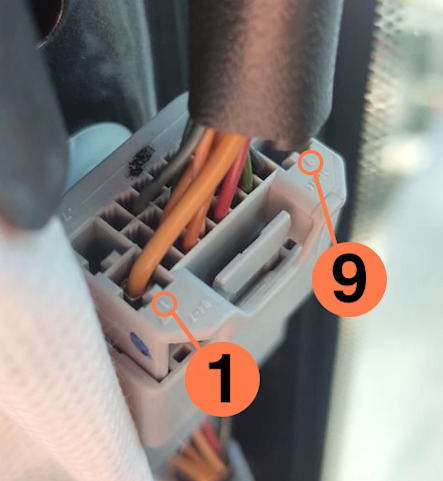
Once you have removed it, disconnect the single wire harness available and release the pin holding it in place, so that you have easier access to the wires in it.
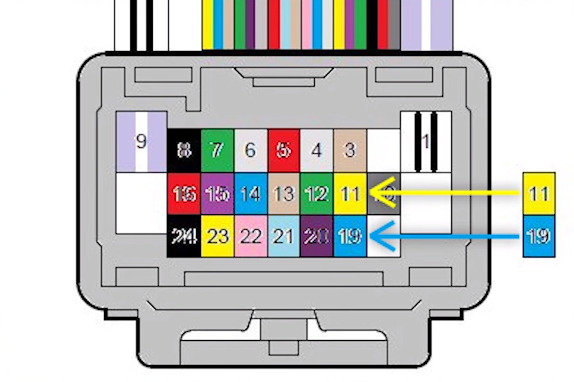
The dome wires are the yellow wire which is negative, and the blue wire which is positive. For further reference, the yellow wire goes to pin 11 in the harness, and the blue goes to pin 19 as seen on diagram below.


11.- Connect to wires in harness and run a wire from the "A" pillar down to the driver footwell
Put together a red and a black wire with electrical tape, and pass it starting where the blue and yellow wires are, behind the dash all the way down to the footwell, where we have our LED strip wires with bullet connectors.
At this point, you can use a 24 AWG splice connector to connect red wire to dome blue wire (positive), and black wire to dome yellow wire (negative). These wires are very thin, for this reason you need to use a splice connector that works with that gauge. I didn’t have at that moment so I had to expose the copper inside the blue and yellow wire in order to connect the red and black wire to them, then sealed the contact with electrical tape in both liquid and solid forms.
12.- Cut the wires coming from above and add female bullet terminals
Cut any excess wire you may have left from the wire coming from above, and leave it long enough to reach the male bullet terminals in the wires coming from LED strips. Then add female bullet terminals to both red and black ends, make sure to seal the connection using heat-shrink.
Then connect male and female bullet terminals matching their respective colors, and tuck the wires anywhere as they will be covered by the plastic panel.
13.- Cover the harness' wires with electrical tape, connect it, and put everything in place
Make sure that there is nothing covering the airbag as it must be completely free in order for correct deployment in an emergency.
Cover the connections made in the harness’ wires with electrical tape, make it tight so that it ends with a clean and professional look. Then connect the harness and place it secured with the plastic pin (if you removed it on step 10).
Afterwards put all plastic covers in their respective places, put back the “A” pillar cover in place, and connect the negative terminal of the battery.
14.- Test the lights and check no error messages pop in the dash
If you followed this steps correctly, the lights should be working as desired. Check their behavior, they should turn on fading in and turn off fading out the same way as the dome lights.
Once you are done with all this, enjoy your newly installed running board led underglow lights!
PD: Waterproof LED strips using silicone caulk
This is not necessary if your LEDs are completely waterproof, but if you are like me and buy some chinese made LED strip knock-offs, maybe you’ll run into some issues.
This LED strip was advertised as waterproof but it wasn’t entirely. So I had this issue that when it started raining, the dome lights would start flashing randomly. The cause was that this LED strip is basically several short strips soldered together, so a few soldered points were a little bit out of the waterproof silicone.
For this reason I decided to buy some silicone caulk and cover both LED strips from start to finish with a light coat. This step was enough to solve the issue and stop the flashing issue of the dome lights!

Diego
Very Interesting, hopefully new projects can come out !
Gabriel E Hidalgo
Dude thanks so much for this tutorial! Probably the most thorough explanation I’ve seen for this online